Advanced-adblock: Difference between revisions
m (Text replacement - "FreshTomato" to "Tomato64") |
|||
| (17 intermediate revisions by the same user not shown) | |||
| Line 66: | Line 66: | ||
<br /> | <br /> | ||
[[File: | [[File:Adblock-v2-settings.jpg|frame|none]] | ||
<br /> | <br /> | ||
| Line 85: | Line 85: | ||
<br /> | <br /> | ||
[[File: | [[File:20230125-183852.png|frame|none]] | ||
<br /> | <br /> | ||
A good way to view Adblock log entries is to go to the [[status-log|Logs]] menu and type "adblock" in the "Find in syslog" field. This filters the view to show only adblock entries. When set to level 7, adblock produces additional debugging files. These files are saved in /tmp/adblock.debug.$now, (where "$now" is the absolute number of seconds elapsed). References to adblock in the the trace file will then be displayed in the Web interface.<br /> | A good way to view Adblock log entries is to go to the [[status-log|Logs]] menu and type "adblock" in the "Find in syslog" field. This filters the view to show only adblock entries. When set to level 7, adblock produces additional debugging files. These files are saved in /tmp/adblock.debug.$now, (where "$now" is the absolute number of seconds elapsed). References to adblock in the the trace file will then be displayed in the Web interface.<br /> | ||
<br /> | <br /> | ||
[[File: | [[File:20230125-163305.png|frame|none]] | ||
<br /> | |||
<br /> | <br /> | ||
'''Blockfile size limit (v2 only)''': | '''Blockfile size limit (v2 only)''': | ||
| Line 97: | Line 98: | ||
<br /> | <br /> | ||
[[File: | [[File:20230125-184022.png|frame|none]] | ||
<br /> | <br /> | ||
| Line 110: | Line 111: | ||
<br /> | <br /> | ||
[[File: | [[File:Adblock-v2-custom path.jpg|frame|none]] | ||
<br /> | <br /> | ||
| Line 146: | Line 147: | ||
<br /> | <br /> | ||
[[File: | [[File:Adblock-v2-domain blocklist urls and list-of-lists.jpg|frame|none]] | ||
<br /> | <br /> | ||
| Line 204: | Line 205: | ||
=== Domain blacklist custom === | === Domain blacklist custom === | ||
[[File: | [[File:20230425-145638.png|frame|none]] | ||
<br /> | <br /> | ||
| Line 248: | Line 249: | ||
=== Domain whitelist === | === Domain whitelist === | ||
[[File: | [[File:20230425-145820.png|frame|none]] | ||
<br /> | <br /> | ||
| Line 308: | Line 310: | ||
## After the whitelist has been edited, to configure settings in [[admin-buttons|Buttons/LED]] as follows:<br /> | ## After the whitelist has been edited, to configure settings in [[admin-buttons|Buttons/LED]] as follows:<br /> | ||
<br /> | <br /> | ||
[[File: | [[File:20230125-142049.png|frame|none]] | ||
<br /> | |||
<br /> | <br /> | ||
<br /> | <br /> | ||
| Line 356: | Line 359: | ||
<br /> | <br /> | ||
<br /> | <br /> | ||
[[File: | [[File:20230210-144106.png|frame|none]] | ||
<br /> | |||
<br /> | <br /> | ||
| Line 378: | Line 382: | ||
To get help with adblock at the command line, type <code>adblock help</code> . This will produce the following output:<br /> | To get help with adblock at the command line, type <code>adblock help</code> . This will produce the following output:<br /> | ||
<br /> | <br /> | ||
[[File: | [[File:20230210-141113.png|frame|none]] | ||
<br /> | |||
<br /> | |||
<br /> | <br /> | ||
<br /> | <br /> | ||
<br /> | <br /> | ||
[[File:20230125-163607.png|frame|none]] | |||
<br /> | <br /> | ||
<br /> | <br /> | ||
<br /> | <br /> | ||
| Line 390: | Line 396: | ||
<br /> | <br /> | ||
[[File: | [[File:20230207-193120.png|frame|none]] | ||
<br /> | |||
<br /> | <br /> | ||
<br /> | <br /> | ||
| Line 397: | Line 404: | ||
<br /> | <br /> | ||
[[File: | [[File:20230123-133409.png|frame|none]] | ||
<br /> | |||
<br /> | <br /> | ||
<br /> | <br /> | ||
| Line 414: | Line 422: | ||
{| class="wikitable" | {| class="wikitable" | ||
|- | |- | ||
| [[File: | | rowspan="8" | [[File:20230123-173851.png|200px|none]] | ||
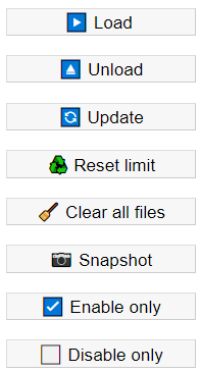
| '''Load:''' (start) will try to run the script. If the script's last run was a full run and then it stopped, Load will exit the script and recover functionality (normal operation?) without a full processing of lists. This will save processing time. Load also occurs at boot time. | | '''Load:''' (start) will try to run the script. If the script's last run was a full run and then it stopped, Load will exit the script and recover functionality (normal operation?) without a full processing of lists. This will save processing time. Load also occurs at boot time. | ||
|- | |- | ||
| '''Unload:''' (stop) stops the script, regardless of what it's doing. It will also force-kill any child process if this is to be run while the script is already loading. If a full version of the script is found and external storage enabled, Unload will move the blockfile from external storage without destroying it. This allows extremely quick load times. Unload preserves the adblock.dnsmasq file. | | '''Unload:''' (stop) stops the script, regardless of what it's doing. It will also force-kill any child process if this is to be run while the script is already loading. If a full version of the script is found and external storage enabled, Unload will move the blockfile from external storage without destroying it. This allows extremely quick load times. Unload preserves the adblock.dnsmasq file. | ||
|- | |- | ||
| '''Update:''' forces an update. There is a 30-minute interval between updates. Thus, if Update is run too often, adblock may not update, but instead, log the reason (active hold-time) it didn't update. When relevant, both GUI and command line will report the interval time. To force an update, first click Unload, and then Update. This bypasses the interval period. | | '''Update:''' forces an update. There is a 30-minute interval between updates. Thus, if Update is run too often, adblock may not update, but instead, log the reason (active hold-time) it didn't update. When relevant, both GUI and command line will report the interval time. To force an update, first click Unload, and then Update. This bypasses the interval period. | ||
|- | |- | ||
| | | '''Reset-limit: ''' <code>nvram unset adblock_limit</code> variable and recalculate the default value for you. | ||
|- | |- | ||
| '''Clear all files:''' This is helpful when certain configuration problems occur. For example, if files or nvram become corrupted, or if adblock_limit or dnsmasq.adblock become too large. The former can happen if adblock_limit was calculated before taking into account new or larger running processes.<br /> | | '''Clear all files:''' This is helpful when certain configuration problems occur. For example, if files or nvram become corrupted, or if adblock_limit or dnsmasq.adblock become too large. The former can happen if adblock_limit was calculated before taking into account new or larger running processes.<br /> | ||
<br /> | <br /> | ||
| Line 438: | Line 442: | ||
The biggest difference between clear and unload is that clear creates an environment as if adblock had never run, whereas Unload preserves adblock.dnsmasq. This makes quick-start possible when only unload has been run. | The biggest difference between clear and unload is that clear creates an environment as if adblock had never run, whereas Unload preserves adblock.dnsmasq. This makes quick-start possible when only unload has been run. | ||
|- | |- | ||
| '''Snapshot:''' is used for troubleshooting. It captures the list of relevant files and saves it to: /tmp/adblock.snapshot.${now.in.seconds}. You can take multiple screenshots before, after and even while the script is running. A popup confirms the snapshot was taken and the file location. | | '''Snapshot:''' is used for troubleshooting. It captures the list of relevant files and saves it to: /tmp/adblock.snapshot.${now.in.seconds}. You can take multiple screenshots before, after and even while the script is running. A popup confirms the snapshot was taken and the file location. | ||
|- | |- | ||
| '''Enable Only:''' In v1, to enable/disable adblock, you had to click Save. This isn't always convenient, especially if a large number of lists is loaded. This button lets you enable adblock (<code>nvram set adblock_enable=1</code> + <code>nvram commit</code>) on the stand. | | '''Enable Only:''' In v1, to enable/disable adblock, you had to click Save. This isn't always convenient, especially if a large number of lists is loaded. This button lets you enable adblock (<code>nvram set adblock_enable=1</code> + <code>nvram commit</code>) on the stand. | ||
|- | |- | ||
| '''Disable Only:''' This lets you disable adblock (<code>nvram set adblock_enable=0</code> + <code>nvram commit</code>) without having to click Save.<br /> | | '''Disable Only:''' This lets you disable adblock (<code>nvram set adblock_enable=0</code> + <code>nvram commit</code>) without having to click Save.<br /> | ||
| Line 454: | Line 455: | ||
<span id="quick-run-v2-and-full-run-operations"></span> | <span id="quick-run-v2-and-full-run-operations"></span> | ||
== Quick-run (v2) and Full-run Operations == | == Quick-run (v2) and Full-run Operations == | ||
<br /> | <br /> | ||
[[File: | [[File:20230201-201249.png|frame|none]] | ||
<br /> | |||
<br /> | <br /> | ||
Modifications to the adblock script configuration can be categorized as follows: | Modifications to the adblock script configuration can be categorized as follows: | ||
| Line 489: | Line 492: | ||
<br /> | <br /> | ||
<br /> | <br /> | ||
[[File: | [[File:20230125-184348.png|frame|none]] | ||
<br /> | <br /> | ||
| Line 570: | Line 573: | ||
<br /> | <br /> | ||
[[File: | [[File:20230210-135935.png|frame|none]] | ||
<br /> | |||
<br /> | <br /> | ||
To simplify and speed up testing of broken resolution or other DNS issues, use the "test" switch.<br /> | To simplify and speed up testing of broken resolution or other DNS issues, use the "test" switch.<br /> | ||
| Line 603: | Line 607: | ||
<br /> | <br /> | ||
[[File: | [[File:Crontab-syntax.gif|frame|none]] | ||
<br /> | <br /> | ||
| Line 672: | Line 676: | ||
<br /> | <br /> | ||
When a trace is running, Tomato64 will display this (FIX ME!) in the Web interface:<br /> | When a trace is running, Tomato64 will display this (FIX ME!) in the Web interface:<br /> | ||
[[File: | [[File:20230125-163607.png|frame|none]] | ||
<br /> | |||
<br /> | <br /> | ||
<br /> | <br /> | ||
| Line 679: | Line 684: | ||
<br /> | <br /> | ||
[[File: | [[File:20230207-193120.png|frameless|none]] | ||
<br /> | |||
<br /> | <br /> | ||
<br /> | <br /> | ||
| Line 686: | Line 692: | ||
<br /> | <br /> | ||
[[File: | [[File:20230123-133409.png|frame|none]] | ||
<br /> | |||
<br /> | <br /> | ||
<br /> | <br /> | ||
| Line 696: | Line 703: | ||
<br /> | <br /> | ||
[[File: | [[File:20230124-162651.png|frame|none]] | ||
<br /> | <br /> | ||
[[File: | [[File:20230124-162536.png|frame|none]] | ||
<br /> | |||
<br /> | <br /> | ||
Alternatively, you can disable this globally via the "Private Relay" setting, as seen here: | Alternatively, you can disable this globally via the "Private Relay" setting, as seen here: | ||
<br /> | <br /> | ||
[[File: | [[File:20220611-144641.png|frame|none]] | ||
<br /> | |||
<br /> | <br /> | ||
You might connect your mobile/laptop to different wireless networks at different locations. For this reason, it makes sense to disable Private Relay on a per WLAN basis. It is advised that you disable it wherever Tomato64 provides your Internet connection and Adblock is running. | You might connect your mobile/laptop to different wireless networks at different locations. For this reason, it makes sense to disable Private Relay on a per WLAN basis. It is advised that you disable it wherever Tomato64 provides your Internet connection and Adblock is running. | ||
Remember, these options are only available for paid iCloud customers. | Remember, these options are only available for paid iCloud customers. | ||
Latest revision as of 05:19, 30 September 2023
Adblock
This menu contains settings to configure Tomato64's ad blocker. It is strongly advised that you read the How Adblock Works section to understand its functioning, even if you use v2.
In documentation, the function/menu will be spelled capitalized ("Adblock"). The actual script will be spelled "adblock", in lower case.
v1 and v2
There are currently two versions of Adblock: adblock_v1 and adblock_v2.
This table lists the Adblock versions available on different types of hardware
| Hardware | FT < 2023.1 | FT >= 2023.1 |
|---|---|---|
| MIPS R1 | v1 | v1 |
| MIPS R2 | v1 | v2 |
| ARM | v1 | v2 |
Adblock v1 functionality is a reduced version of ad-blocking scripts taken from code outside Tomato64. Enabling one of those scripts and Tomato64 Adblock at the same time may cause conflicts. Do not enable both.
Adblock v2 uses advanced methods to block ads. It should be the preferred choice whenever possible.
How Adblock Works
Tomato64's Adblock works through DNS cache poisoning, as follows:
- dnsmasq resolves the domain's correct IP address.
- The adblock script then replaces that address with an address of 0.0.0.0 .
- The 0.0.0.0 address is sent to the client requesting DNS resolution.
- Since 0.0.0.0. is an NXDOMAIN (invalid/unknown address), no connection is made to that URL.
Given a list of sources, the original script simply blocks ads. However, there are other reasons for your network to avoid communicating with certain servers. This function was therefore renamed "DNS Filtering" to reflect its progression towards a wider function.
Adblock Settings
Enable: Checking this box turns on Adblock.
The adblock script downloads lists of URLs/domains to block, mostly from the Blacklist URL & Group-of-lists table. You can select or deselect any list in this table to be included in the downloads (the "blocklist").
Debug mode (v1)
Checking this box enables debug mode for dnsmasq in the log. This tells Tomato64 that you want all DNS queries routed to dnsmasq to be logged to the system log. This is useful when testing/troubleshooting Adblock. For more on testing, see the Notes and Troubleshooting section of this page. This option is identical to "Debug Mode" in the DHCP/DNS/TFTP menu. Thus, in v2, it was removed from the Adblock menu.
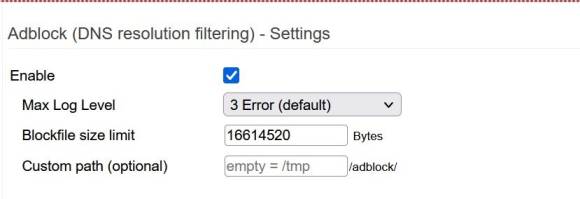
Max Log Level (v2):
Thew newer v2 interface lets you set the maximum log level output the script will generate.
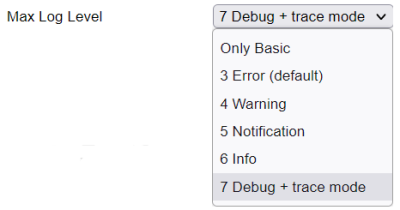
Supported levels include:
- 0: The script will log only basic messages like start and stop.
- 3 (Error) is the default value. Once you are confident with your setup, this setting is sufficient.
- 4
- 5
- 6
- 7 (Debug level) writes very detailed log information. This is helpful when troubleshooting common problems.
The higher the setting, the more detailed will be the information recorded in the logs.
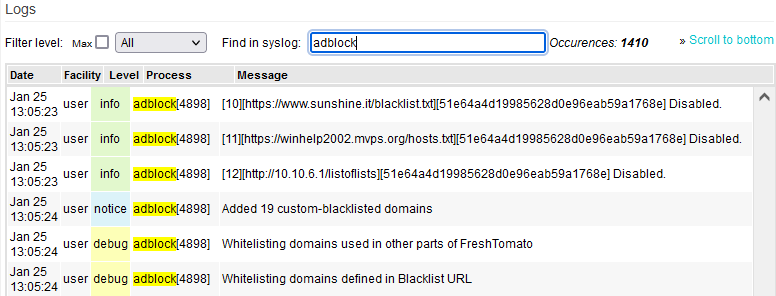
A good way to view Adblock log entries is to go to the Logs menu and type "adblock" in the "Find in syslog" field. This filters the view to show only adblock entries. When set to level 7, adblock produces additional debugging files. These files are saved in /tmp/adblock.debug.$now, (where "$now" is the absolute number of seconds elapsed). References to adblock in the the trace file will then be displayed in the Web interface.
Blockfile size limit (v2 only):
Adblock v1 may crash Tomato64 if it loads lists whose combined information exceeds your router's resource capacity. This can be difficult to assess and troubleshoot. Adblock v2 comes with a customizable "limit" field. If the limit field is left empty, Tomato64 will calculate its value automatically. It will also calculate the value automatically if the router was reset to defaults.

This limit is calculated as 10% of physical RAM (when external storage is set). When no external storage is found, the limit is calculated as 6.5% of RAM. The limit can be also manually configured. However, if your device becomes unstable, you should revert to the auto-calculated value.
This is a limit, not a target. There's nothing wrong with having a small blockfile compared to the limit. A larger blockfile will result in longer restart times for the dnsmasq service. This is important because there will be no DHCP/DNS/TFTP functionality until dnsmasq finishes restarting.
Custom Path (v2):
An important v2 feature is the option to configure a path to permanent storage where adblock can store relevant files. It is strongly advised to specify a custom path. A custom path enables extra functionality in the script. It allows adblock to store whole lists, their http headers and the actual compiled blockfile on external storage. This offloads RAM demand (/tmp) to permanent storage, and allows for information to survive a reboot.

This is very useful when the script is re-run (manually or automatically) and there are no updated lists or configuration changes. The check for configuration changes involves controlling any modification to NVRAM variables since the last script run.
When a custom path is defined, adblock will:
- Download all http headers from only the enabled lists
- Compare those headers with the ones stored locally
- Decide whether to re-process the blocklists or not.
This runs as follows:
- If the configuration wasn't changed and;
- No updated lists are available
- Skip the re-processing and return to idle.
This saves time and resources.
Here, "configuration" means any externally-mapped files where blacklist_custom or whitelists are defined (For example: /mnt/USB/my_whitelist.txt). Using a Custom path also allows adblock to load faster on post-(re)boot.
Domain Blacklist URLs & Group-of-Lists
This table contains a list of the blacklists Tomato64 can download and use to block ads.
On: Checking this box will make a gold star appear. The star confirms Adblock will enable downloading of the blacklist in that row. After selecting which blacklists you wish to use, click Save.
Blacklist URL: This shows the location on the Internet where that blacklist can be found.
NOTE: Since release 2023.4 by default, no blocklists were defined as part of the standard releases. This was done to to reduce NVRAM demand. However, you can add your preferred lists manually. A good summary of these lists is the official Adblock (DNS filtering) lists page on this Wiki.
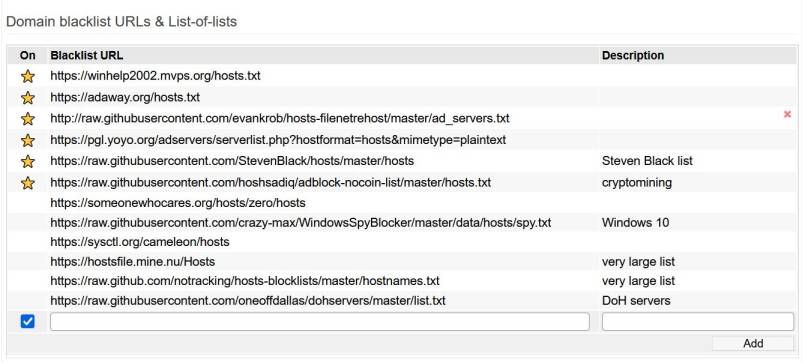
Description: Displays a name (if the publisher used one) or reference for the blacklist in that row.
Delete: If you move your mouse over a row containing a blacklist, a red "x" appears at the end of the row. Clicking "x" will delete that row, permanently deleting that blacklist.
There is no option to reset these to the original Blacklist URL entries.
If you delete a URL that's important to you, you will need to:
- Re-enter it into the Blacklist URL table or;
- Reset Tomato64 to default settings
Add: Clicking this inserts a blank row. In this row, you can type a new URL from which to download and use an additional Blacklist URL.
You can also add a comment in the Description field.
Compatible data formats
Target lists to be downloaded must be in plain text format. As above, v2 can extract domains from lists in a variety of formats. Essentially, adblock uses a regex against each line of the file. Lines from the source file are parsed, comments are removed and then the domains are extracted. This is true regardless of where (in which column) those domains are in the list.
Group-of-lists
Currently, v2 also accepts a new list format called "Group-of-lists". This involves feeding the script a URL which contains links to a list of further URLs. The Group-of-lists is an excellent way to save NVRAM space.
This can be visualized as follows:
URL |--> list
or
URL |--> Group-of-lists-file |--> URL |--> list
                             |--> URL |--> List
                             |--> URL |--> List
                             |--> URL |--> List
The Group-of-lists format has limitations. One limitation is that it doesn't perform verification of the lists to assess whether they need to be downloaded or not.
Adblock automatically handles EOL (End of Line) characters in files, when necessary. It converts them internally.
Group-of-lists are visible in the log file. For example, they might appear as: "[8][2]" The text in this example would mean that adblock is processing the 8th defined list in the Domain blacklist URLs & Group-of-lists on the second line (URL).
Domain blacklist custom

Domain Syntax
Several syntaxes are valid for this list:
- Standard domains (one entry per line)
- A path to a local file where domains are defined. The file should contain one domain per line.
For example: "/mnt/usb/my_blacklist.txt".
- A domain prefixed with a "+" sign will blacklist that domain and force a pruning of any subdomains found in the final blockfile.
When adding custom entries:
If you blacklist: "sub.domain.com", then
"sub1.sub.domain.com"
"sub2.sub.domain.com"
and all other subdomains will be blacklisted.
However, this may not be what you want.
To prevent subdomains of an entry from being filtered, prepend a "+" sign to an entry.
For example, if you enter "+sub.domain.com", only "sub.domain.com" will be blacklisted. "Sub1.sub.domain.com", "sub2.sub.domain.com" and other subdomains will not be filtered.
Prepending a "+" sign to a domain will also force a pruning of any subdomains found in the final blockfile. Pruning removes duplicate/redundant blocklist entries. Duplicate entries make for a larger blockfile size, which can increase processor cycles, RAM usage and storage space. Thus, pruning a significant number of duplicated entries can reduce CPU, memory and storage needs.
Any line starting with a "#" or "!" character is considered a comment and will be ignored.
Sort a-z ↓ : Clicking this button sorts the contents of this field alphabetically.
Domain whitelist

Syntaxes
The Domain whitelist can use:
- Standard domains (one entry per line).
- A path to a file of domains (one domain per line) .
For example: "/mnt/usb/my_whitelist.txt".
- Prepending a "%" sign to an entry indicates a "strict" whitelisting.
Whitelisting always takes precedence over blacklisting.
For example, if a blacklist contained "ads.example.com", whitelisting "example.com"
will undo the blacklisting of "ads.example.com" and all other subdomains.
When adding entries:
If you whitelist: "sub.domain.com", then:
"sub1.sub.domain.com"
"sub2.sub.domain.com"
and all other subdomains will be whitelisted.
You can prevent subdomains of an entry from being whitelisted by prepending a "%" sign to an entry.
For example, if you enter "%sub.domain.com":
"sub.domain.com" will be whitelisted, but;
"Sub1.sub.domain.com", and "sub2.sub.domain.com" will still be blocked.
Any line starting with a "#" or "!" character is considered a comment and will be ignored.
Sort a-z ↓ : Clicking this button sorts the field contents alphabetically.
Maintaining the Domain whitelist
A good way to maintain the whitelist is to share it on your LAN, and educate users about nslookup verification and whitelist additions.
Such a process could be automated as follows:
- Map a file in the Whitelist section of the Adblock menu
- Share the file/folder via Samba, in the File Sharing menu
- Teach users:
- How to use nslookup on a URL to verify DNS lookups are being poisoned
- Where to find the whitelist (via its samba share) and;
- After the whitelist has been edited, to configure settings in Buttons/LED as follows:
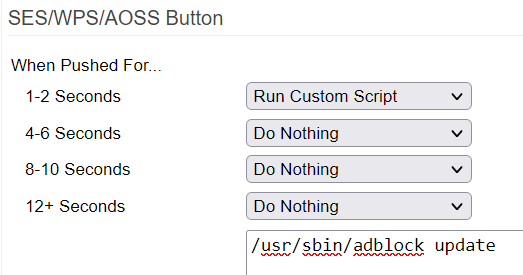
When the correct router button is pressed, these settings will trigger the /usr/sbin/adblock update function .
The time to complete the update may vary. A quick-run might take a few seconds. A full-run might take a few minutes.
Enforcing Client Compliance
For Adblock to work properly, client devices must be configured to use Tomato64's IP address (dnsmasq) as their DNS server. This can be done by configuring a static IP address on the client device itself or through Tomato64's DHCP Service.
For the latter, first enable DHCP in the Network menu. To enable the DNS server, select "Use internal DNS" under in the DHCP/DNS/TFTP menu.
These steps are mandatory. Clients that bypass Tomato64's DNS server will not have their ads blocked.
Three optional settings help ensure proper Adblock operation:
- Enable Intercept DNS port in the DHCP/DNS/TFTP menu.
- Enable Prevent Client auto DoH in the DHCP/DNS/TFTP menu.
- Enable the "DoH Server" list in Adblock. This prevents DoH requests from being resolved.
This is the default DoH Server list since release 2021.6.
It can be found at: https://raw.githubusercontent.com/oneoffdallas/dohservers/master/list.txt
Adblock v1 functionality is a reduced version of ad-blocking scripts taken from code outside Tomato64. Enabling one of those outside scripts and Tomato64 Adblock at the same time may cause conflicts. Do not enable both. Adblock v2 uses advanced methods to block ads. It should be the preferred choice whenever possible.
Adblock/DNS Filtering affects name resolution only. If an application communicates directly via IP address, Adblock cannot prevent that.
Thorough management of domain blocking can be tedious work. For example, with email spam, you'll probably have to deal with false positives.
Regardless of version, the script is always named "adblock", and can be found at: "/usr/sbin/adblock",
Adblock v2
Adblock v2 improves on the original (v1) script. V2 adds a richer feature set, with increased user interaction via a toolbar and command line options.
v2 Improvements
- Adblock v2 performs similar basic DNS filtering functionality to v1, but in a more precise and controlled way.
- Allows you to run certain script functions without having to run all of them, to save time.
- Can accept different list formats (in plain text), and extract domains from files with different layouts.
This includes Easylist format. There may be false positives using Easylist format. For details, see: https://easylist.to/
- Prevents resource starvation. Also, before running, v2 assesses its configuration for blocklist capacity. It's basically self-diagnosing and healing.
- Supports Quick-run. This mode allows you to add a domain to the lists without needing to reprocess (download) entire lists again.
- Supports external storage. Now, lists and headers are stored in optional permanent storage to help decide which lists to download.
- Prevents false positives via a new, hard-coded 30-minute interval between runs. This is enabled after an update is completed.
- Includes more troubleshooting options. Debug logging and script tracing can be enabled to look deep into the
lowest operational level of the script.
- Can be operated from the web interface or at a command line.
To get help with adblock at the command line, type adblock help . This will produce the following output:
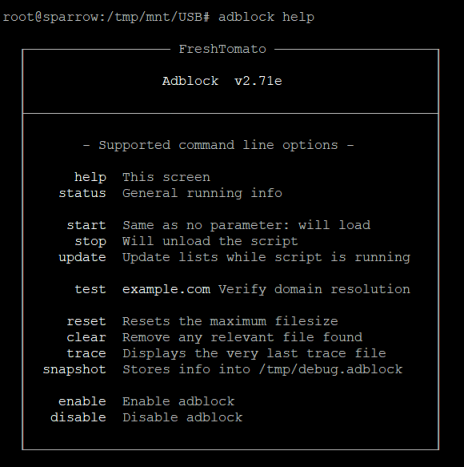

The additional debugging files can also be accessed at the command line by typing the command: adblock status .
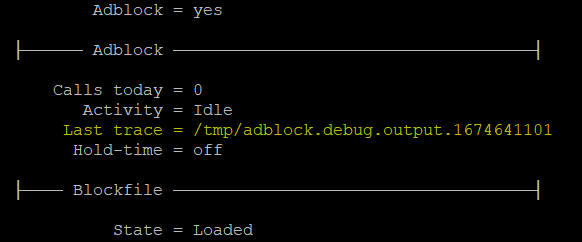
To open the last trace file automatically, simply type adblock trace at a command shell. You will be prompted to select the preferred viewer in which to view the trace files.

Using the v2 Controls
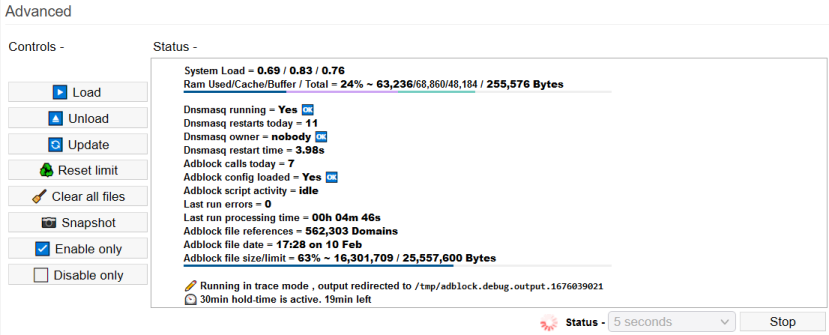
The Controls button bar in the Advanced section let you control adblock script execution.
Refresh: There is now a refresh command at the bottom of the table. Refreshes are limited to a minimum frequency of 5 seconds. The more frequently you run refreshes, the higher the system load will climb.
Quick-run (v2) and Full-run Operations

Modifications to the adblock script configuration can be categorized as follows:
- List (enable/disable)
- List content update
- Change of parameters (loglevel / blockfile limit / path )
- Addition of a simple blacklist_custom
- Addition of a simple whitelist
- Addition of pruning blacklist_custom
- Addition of a strict whitelist
- Removal of a blacklist_custom
- Removal of a whitelist
Only two operations from the above list can be run in Quick-run mode, as they don't require full processing:
- No. (4) Addition of simple custom blacklist domain/s
- No. (5) Addition of simple whitelisted domain/s
Operations (4) and (5) are the most common actions performed when maintaining adblock script configuration. Quick-run operations are performed live on a running blockfile. Therefore, the adblock script must be loaded in order to run functions (4) or (5). A quick-run can be completed in literally seconds. A full-run may take minutes to complete. Any operations other than (4) or (5) above require a full-run.
Please note that "quick" is a temporary action and will allow your change to become immediately functional. In contrast, a successive full-run (manual or scheduled) would process added domains in the standard way.
Command line operations (v2)
Another feature of v2 is the ability to interact with adblock via command line.
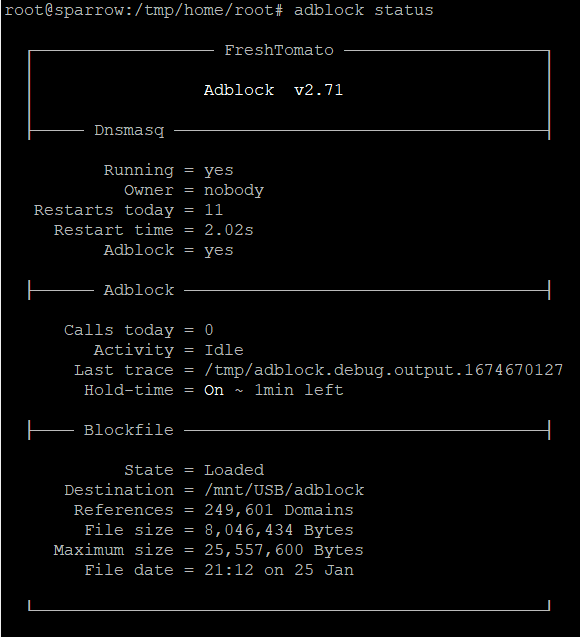
As seen above in the "adblock help" screenshot, v2 has many more functions available to use:
Help
adblock help = Displays a summary guide of the valid commands.
Status
adblock status = Gives constant updates on adblock's operational status.
Start
adblock start = This is the same as "Load" in the Web interface.
Stop
adblock stop = This is the same ad "Unload" in the Web interface.
Update
adblock update = This is the same as "Update" in the Web interface.
Upgrade
adblock upgrade = This parameter checks online for new script versions. If one is available, it asks if you want to install the upgrade. This is a workaround until the next release. This will download the latest version of the script into /tmp (RAM) then mount it over the built-in version.
Since it is stored in RAM, it will be lost after a reboot. Therefore, an extra parameter is supported: adblock upgrade silent . If an upgrade is available, this command triggers it, without prompting you. This switch may be used in the init script, to ensure the latest version runs, even after a reboot.
Test
adblock test $domain= This switch lets you quickly troubleshoot a domain name.
Reset
adblock reset = This is same as "Reset" in the web interface.
Clear/Clean
adblock clear = This is the same as "Clear all files" in the web interface. It resets the blockfile maximum limit.adblock clean
Trace/Status
adblock trace = This is a command line only function. When the script is run with Loglevel = 7, adblock is also running in "trace mode". Every command executed by the script is saved into a trace (log/debug) file. You can find the trace file using adblock status . Running adblock trace will open the latest relevant trace file for you with even less effort.
Snapshot
adblock snapshot = This is the same as "Snapshot" in the web interface.
Enable
adblock enable = This is the same as "Enable" in the web interface.
Disable
adblock disable = This is the same as "Disable" on the web interface.
Adblock test command (v2)
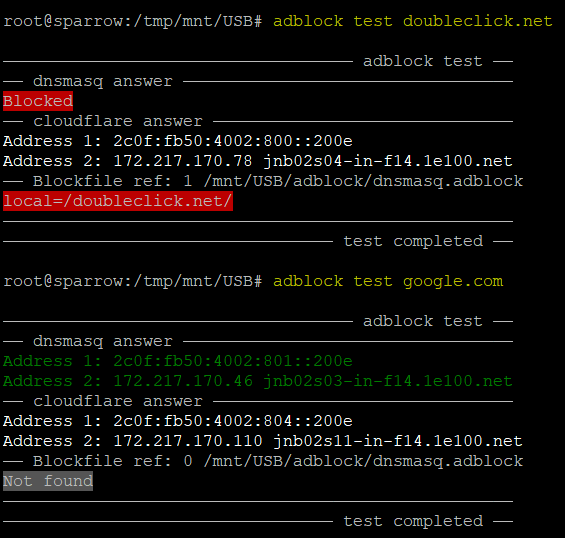
To simplify and speed up testing of broken resolution or other DNS issues, use the "test" switch.
Typing: adblock test example.com will quickly verify whether name resolution is functioning.
Specifically:
- dnsmasq answer - Displays the actual name resolution as seen by the router and LAN users.
The word "Blocked" is displayed if access to the domain was blocked.
- Cloudflare answer - This query bypasses the usual dnsmasq process and sends a query to address 1.1.1.1 .
This can help you to verify if a domain exists.
- Blockfile ref - This checks whether there are any references to the tested domain in the blockfile.
With these three pieces of information, you can easily assess whether a domain is blocked, non-existent, or intact.
Automatic list updates
As part of normal adblock operation, a crontable entry is added to perform a daily list update. Update times are now randomized to prevent DDoS of the list providers' servers. A new update time is set each time you run adblock stop or reboot. The update's time window varies between 02:00 AM and 05:59 AM local time, depending on the script version you're running (original v1, modified v1, or v2).
To verify the current scheduled update time:
root@router:/# cru l | grep adblockJob
28 4 * * * /usr/sbin/adblock update #adblockJob#
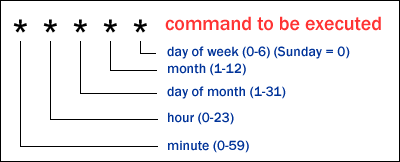
In this example, it's 28 (min) 4 (am) * (Every day) * (Every month) * (Every day of the week).
This picture illustrates the syntax of crontable expressions:
For help automating/verifying correct crontable expressions, see: crontab.guru
If you stop adblock, the crontable expression is removed. This is by design.
Future development goals
- Add an option to let Tomato64 users share their Whitelists.
This would allow the creation of a shared database of "good" domains, according to users.
This shared whitelist would be downloaded just as you would download any blacklist.
- Add a test function to the web interface (currently only command line)
Adblock Notes and Troubleshooting
Troubleshooting v1
You can test Blacklisted or Custom entries to see if Adblock is properly redirecting them by using the nslookup tool (Windows, Linux or MacOS). Simply run nslookup and enter the domain/URL to be tested. If it resolves to 0.0.0.0, then Adblock is working properly, and the domain is being blocked. You can also check Tomato64's System log (Syslog) to see if Adblock activity is reflected there.
For example, this entry shows that dnsmasq replaced the true IP address of hbx.media.net with 0.0.0.0.
Jan 9 19:57:29 rt-n66 daemon.info dnsmasq[4872]: config hbx.media.net is 0.0.0.0
Adblock worked properly in this case.
If your router crashes, you may be using too many large Blacklists, which can exhaust available RAM. Try using smaller blacklists, or fewer large ones. Adblock v2 is much less likely to experience this issue.
There are websites available that allow you to test the effectiveness of your Adblock configuration. When doing so, please ensure you don't have any adblock/script-block plugins enabled on your browser or your results will be invalidated. Some good adblock testing sites include:
Adblock doesn't work with DoH and other Encrypted DNS lookups
Increasingly, devices are using DNSSEC, and encrypted DNS protocols, such as DoH [DNS over HTTP(S)]. Adblock does not work with these DNS lookup methods. This is because if lookup requests are encrypted or directed to a third-party server, Adblock can't intercept, and therefore can't poison them.
As mentioned earlier, enabling the "DoH Server" in the Blacklist URL table may remedy this problem. It will download and then block access to common DoH servers.
Troubleshooting v2
For troubleshooting, it is recommended that you set the loglevel setting at 7, (as described in the Settings section above). Then, analyze the logs and trace file. It's surprising how often the list providers suffer from issues such as downtime, or a broken cache. It's common to see adblock fail to download a list one day but successfully download it the next day without changes to your settings.
In order to learn what might be going wrong, it's crucial to understand adblock's status indicators. Here are a few signs which may indicate a problem:
- System load is too high in the 5min+ section (For example, > 1.5)
- RAM usage is too high (> 90%)
- dnsmasq ownership remains root (non-operational) until lists are fully loaded. It's normal to see "root" briefly, but this should switch to "nobody" within 20 seconds.
- Too many dnsmasq restarts
- dnsmasq restart time is too high (> 15 seconds)
- adblock calls today
- last run errors
If the Blockfile size exceeds the Blockfile size limit value, the blockfile size will be reduced. If (with limit manually set high) dnsmasq still struggles to run properly after this, the safeDnsmasqRestart() process will reduce the Blockfile size in increments of 5% and reattempt to fully start dnsmasq after each reduction. When dnsmasq functions properly, the new auto-calculated limit is set as the current Blockfile size limit.
When a trace is running, Tomato64 will display this (FIX ME!) in the Web interface:

The additional debugging files can also be accessed at the command line by typing: adblock status
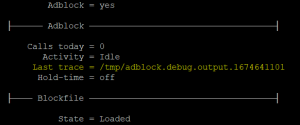
To open the last trace file automatically, simply type adblock trace at a command shell. You will be prompted to select the preferred viewer in which to view the trace files.

Apple iOS devices (paid iCloud service only)
Apple IOS devices have settings that may interfere with adblock operations. The "Limit Address Tracking" option can be disabled on a per WLAN basis, as seen in the image below:
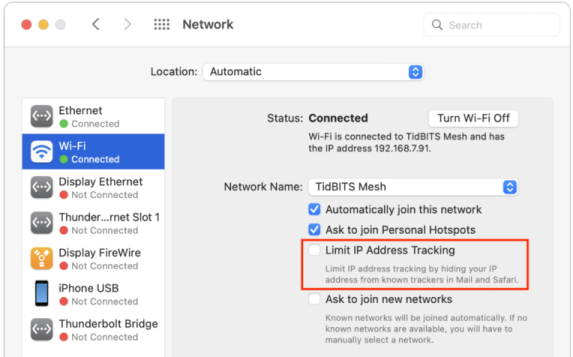
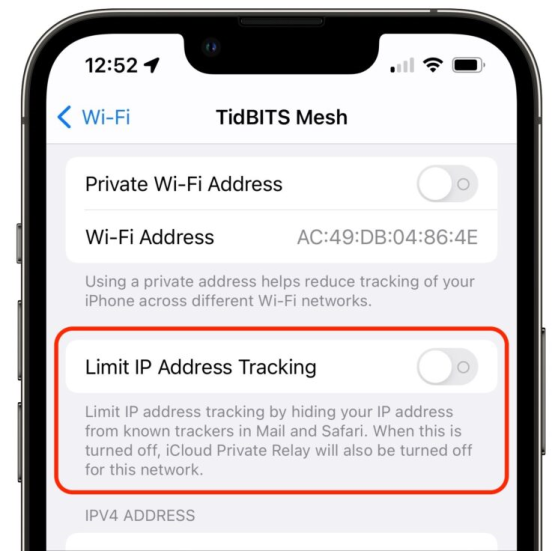
Alternatively, you can disable this globally via the "Private Relay" setting, as seen here:
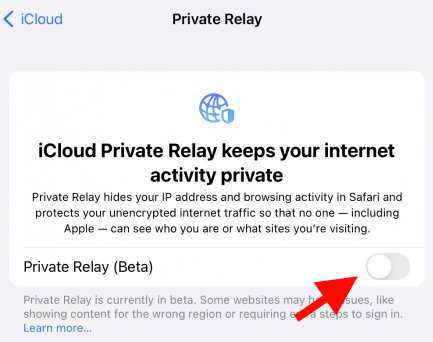
You might connect your mobile/laptop to different wireless networks at different locations. For this reason, it makes sense to disable Private Relay on a per WLAN basis. It is advised that you disable it wherever Tomato64 provides your Internet connection and Adblock is running.
Remember, these options are only available for paid iCloud customers.
